A comprehensive guide with pictures and gifs explaining everything there is to know about Braces. Including Bracecubes, Warped Braces, Connection points and much more.
Braces are blocks that you can use to connect other blocks together with. They don't have any collider, in other words, they can't touch anything if they aren't connected beforehand. As a result, any brace that is not connected will fall through the ground and disappear.
Placing them can be strange at first, at least in comparison to how you would place other blocks. You begin by placing the first end on the block you want it to start on, then you need to hold the mouse-button and drag it to the block you want the other end to connect to. When you have it in the correct place, release the mouse-button and it will place itself.

Braces are important for the structural integrity of the machine, and it can be used to connect things that may overlap when the machine is in simulation mode, due to it not having a collider.

Moreover, braces can be used in "reaction-wheels" or "torque-steering", where a wheel spins one direction, so the machine turns the other. The reason why this steering works is because braces for some reason have a much higher angular drag compared to all other blocks in the game. This doesn't make any sense when you compare it to real life. If you don't understand why or what that is, you could imagine that braces are in some sort of liquid, like water or honey as they turn and spin, and not in normal air which all other blocks are.
Essentially, braces "feel" heavier when they're not and can therefore be used as steering.

Another useful thing about braces is that you can use them for bodywork / paneling when building smooth looking machines. This is generally done using bracecubes. (See the next section)
Moving away from the basics, and all that you need to know in order to complete the levels, braces can be useful when creating machines based on aesthetics.
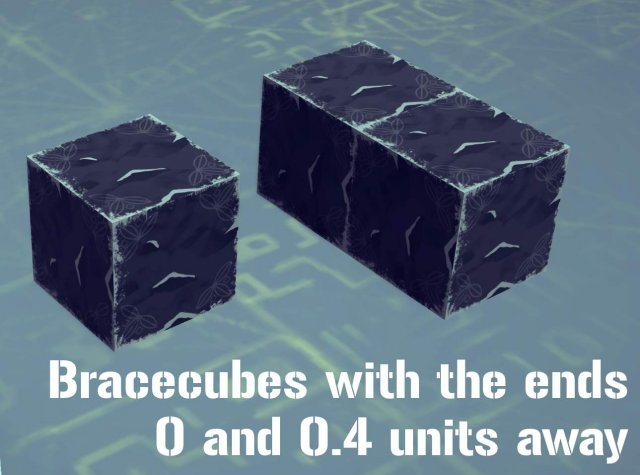
"Bracecubes" are simply put a brace where both ends are at a 0 distance from each other, creating a cube. Hence the name Brace-cube. There are similar braces you can create where both ends are 0.4 units away from each other, creating a longer one. This can sometimes be useful if you don't use any mods.
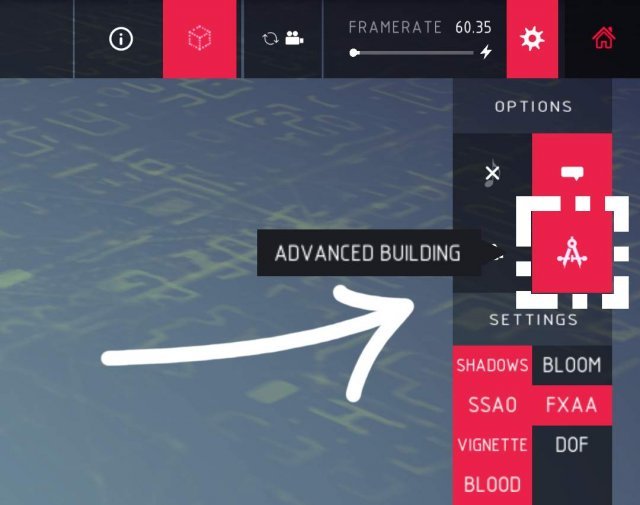
Perhaps you are completely new to all this, but want to learn how to place the ones with 0.4 distance. You need to begin by enabling the Advanced Building option in the top right when in a level or the sandbox.
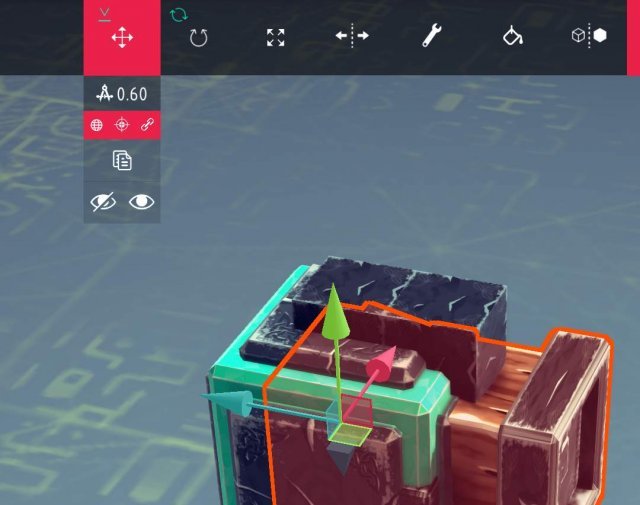
With the Advanced Building turned on, you can select blocks, move them and rotate them. If you want to make the 0.4 Brace, place a block and move it inwards by 0.6 units (as shown in the picture). Then simply place the brace and drag them between the blocks.
This can of course be done differently, and if you are precise enough, you might be able to create a 0 distance bracecube this way, but I wouldn't recommend that.
I won't go into detail of how to use the mod, but it adds a slider where you can adjust the length of the brace and it adds a new bracecube-block in the block section. Note: while it's a "new block", all it does is to place a vanilla 0-distance bracecube. You therefore don't need the mod to use creations that are built using it. In addition, the mod allows for you to manually input the rotation of the brace ends. This will be useful when trying to "warp" them (See the Warped bracecube section).
Bodywork
As I said before, they can be used as bodywork and paneling to make things look good.
But how? They're just cubes...
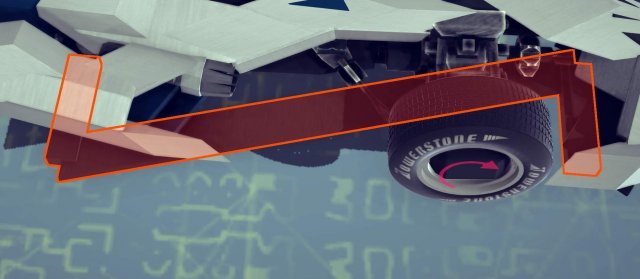
That's exactly the reason why, they're simple geometric shapes, so if you have any scaling mods you can scale them how ever you'd like. But you have to be aware that the connection area the braces have, correlates to the largest scale it has in one direction (This will be explained in the Connection point / Trigger section). And they're not just simple geometric shapes, they also don't have any collider. This allows you to create sections where blocks go straight through the bodywork. An example would be around the wheels on realistic looking cars so the wheels don't bump the bodywork causing it to break off.
I can't explain what makes the bodywork look good. This can be compared to drawing. I can't really say what you need to do to make a drawing look good, but I know that you can look at what others have made, and try to make similar things yourself. If the reason to why you clicked is to learn how to make good looking bodywork, I hope you understand that it can't really be taught. Only practice makes perfect for this.
Images are probably the easiest way to describe what they are.
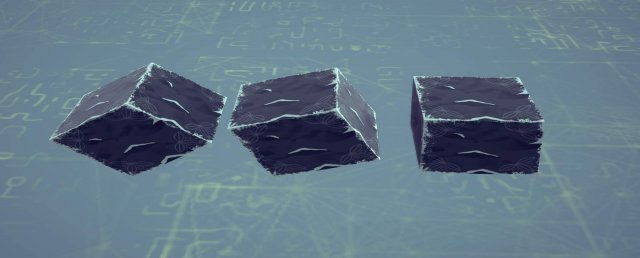
The reason why they look like this is because the entire brace is scaled, not each endpoint by themselves. See image below

These can be used the same way normal braces are used, but they can be vastly different shapes and the connection point / trigger area is smaller. With enough practice, you can often use less blocks by having the correct warped brace instead of the blocks you would have used otherwise. But you can easily replace areas where you need to fill in an edge that isn't just 90 degrees.
There are two easy ways to create them. The first way is to duplicate a brace when you are rotating it at the same time. This can be done by holding down the rotation gizmo, and duplicating with Ctrl + D As shown below.


How much you angle it before duplicating it is how much the warp will appear to be "warped". Scaling is of course as important for creating the right shape when warping as well.
The other way is to use the bracecube mod and editing the values yourself.

It's also worth noting that you can warp it as many times as you would like, and in as many specific rotations as you would like. If the brace is warped more than two times, on two different axis, they are sometimes called "Double-Warped bracecubes".
You can of course warp "normal" braces as well.
The first end of the brace has the same connection point / trigger as the majority of blocks. It is always spherical and connects only to one other block. The other end of the brace has a different trigger which can connect to many blocks at once. It becomes a spherical super-glue connection.

Additionally, if the first end is connected to a block, but the second isn't. The second trigger will remain "sticky" for approximately 1 second after the simulation has started, meaning that it will work similarly to how grabbers work during that timespan. But instead of attaching to everything, it only attaches to attachmentpoints and certain types of colliders (Cyan-ish color, and green with the Colliderscope mod posted further down)
When building and scaling braces or bracecubes you need to be aware that these connection points always stays as a sphere. The size of the sphere is based on the largest size you scale the block to. Let's say that you create a slim, but long bracecube. This will be the size of the trigger.
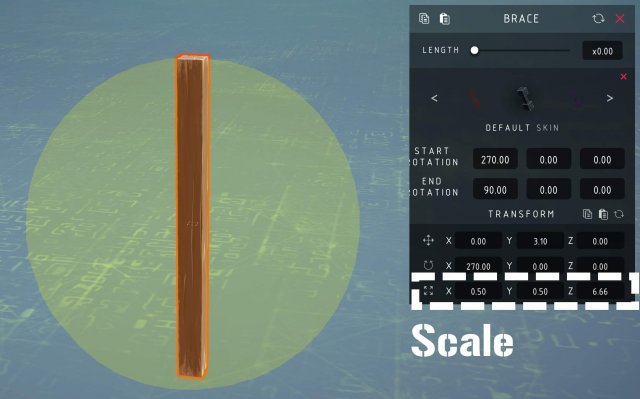
This can both be used to your advantage, or in some cases where you don't want everything to connect, it can be quite bad.
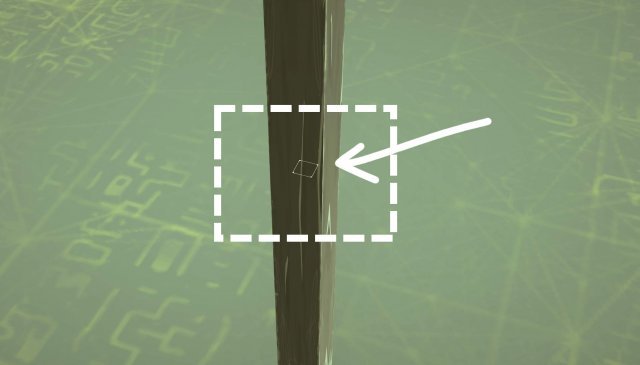
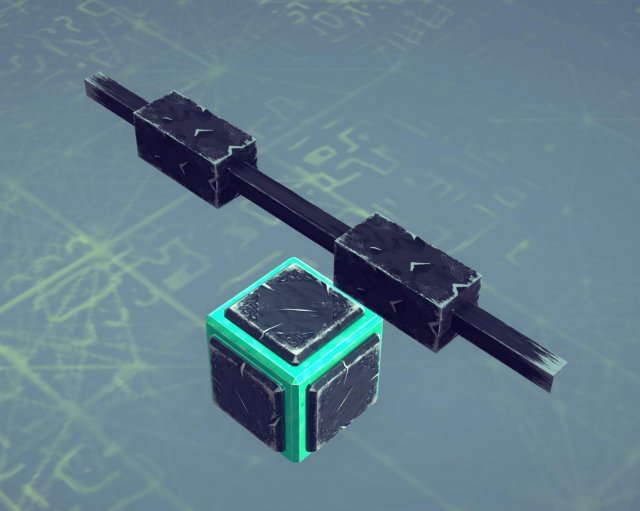
Another thing about the brace triggers is that in order to select a brace, you need to select the bar in between each end. With a 0 distance bar like the ones in bracecubes, it will be extremely difficult to select braces unless you know where the bar is located. Here is the small area you can select based on the previously shown long brace.
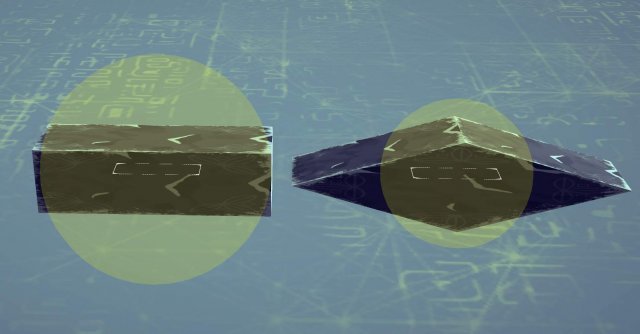
With the Colliderscope mod installed, you can easily see how warped braces always have a smaller connection point compared to normal ones with the same size.
BES
There are always strange behaviours found when using braces. An example that can cause a lot of problems, but can be quite useful when used properly is the so called "BES" by many of those who use it.
The name BES (Brace Entanglement Stabilization) comes from another name "VES" (Vector Entanglement Stabilization) both named by the user Neon. VES is a glitch used by creating a 2d scaled spring into a stabilization device. The brace version is similar, hence a similar name, but with a B instead. But it's not the same (Which is why I think the name isn't the best). It's created when you scale down a "normal" brace with a bar in the axis that the bar is pointed. Anything under 1.00 will give a slight effect of this, but when it becomes 0.1 down towards 0.001, effects start happening. It becomes really stabilized and effectively the block it is attached to as well. It is essentially pushing away the center of mass of the creation down towards infinity. There are however side-effects. BES will start to "wobble", but it's really really slow, and since it's so strong, whatever is attached will most likely flip and get crushed in doing so.
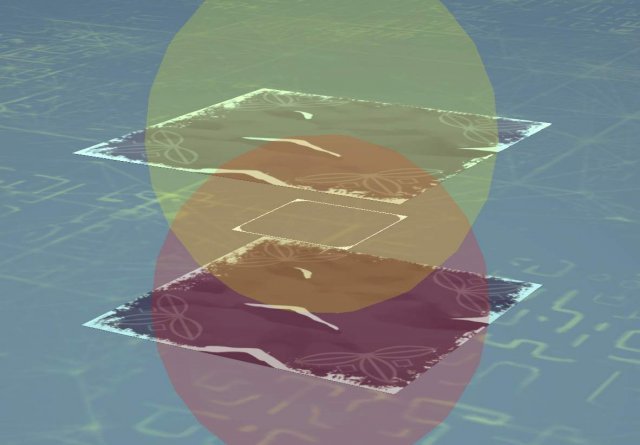
Testing is still needed about it, but there are ways people have found to stop this from happening as you might want to use a brace that is smaller than 1.0 in scale. An easy solution, perhaps not the prettiest, is to simply duplicate the brace, turn it 180 degrees, and move it so the startpoint is in the endpoint of the other brace. Mirroring it over essentially.
Long / short midpoint
When scaling normal braces, you can also see that the bar in the middle doesn't scale properly. I generally don't like that this happens, but I know that it can be utilized. I have for example seen cars use these midpoints as decoration, and with the right angles you could probably create various shapes you wouldn't have been able to create otherwise.
Guide on Bracecubes, Warped Braces, Connection Points
The Basics
Braces are blocks that you can use to connect other blocks together with. They don't have any collider, in other words, they can't touch anything if they aren't connected beforehand. As a result, any brace that is not connected will fall through the ground and disappear.
Placing them can be strange at first, at least in comparison to how you would place other blocks. You begin by placing the first end on the block you want it to start on, then you need to hold the mouse-button and drag it to the block you want the other end to connect to. When you have it in the correct place, release the mouse-button and it will place itself.

Usage
Braces are important for the structural integrity of the machine, and it can be used to connect things that may overlap when the machine is in simulation mode, due to it not having a collider.

Moreover, braces can be used in "reaction-wheels" or "torque-steering", where a wheel spins one direction, so the machine turns the other. The reason why this steering works is because braces for some reason have a much higher angular drag compared to all other blocks in the game. This doesn't make any sense when you compare it to real life. If you don't understand why or what that is, you could imagine that braces are in some sort of liquid, like water or honey as they turn and spin, and not in normal air which all other blocks are.
Essentially, braces "feel" heavier when they're not and can therefore be used as steering.

Another useful thing about braces is that you can use them for bodywork / paneling when building smooth looking machines. This is generally done using bracecubes. (See the next section)
Bracecubes
Moving away from the basics, and all that you need to know in order to complete the levels, braces can be useful when creating machines based on aesthetics.
"Bracecubes" are simply put a brace where both ends are at a 0 distance from each other, creating a cube. Hence the name Brace-cube. There are similar braces you can create where both ends are 0.4 units away from each other, creating a longer one. This can sometimes be useful if you don't use any mods.

Perhaps you are completely new to all this, but want to learn how to place the ones with 0.4 distance. You need to begin by enabling the Advanced Building option in the top right when in a level or the sandbox.

With the Advanced Building turned on, you can select blocks, move them and rotate them. If you want to make the 0.4 Brace, place a block and move it inwards by 0.6 units (as shown in the picture). Then simply place the brace and drag them between the blocks.

This can of course be done differently, and if you are precise enough, you might be able to create a 0 distance bracecube this way, but I wouldn't recommend that.
- Instead I would recommend downloading the bracecube mod from the steam workshop.
I won't go into detail of how to use the mod, but it adds a slider where you can adjust the length of the brace and it adds a new bracecube-block in the block section. Note: while it's a "new block", all it does is to place a vanilla 0-distance bracecube. You therefore don't need the mod to use creations that are built using it. In addition, the mod allows for you to manually input the rotation of the brace ends. This will be useful when trying to "warp" them (See the Warped bracecube section).
Bodywork
As I said before, they can be used as bodywork and paneling to make things look good.
But how? They're just cubes...
That's exactly the reason why, they're simple geometric shapes, so if you have any scaling mods you can scale them how ever you'd like. But you have to be aware that the connection area the braces have, correlates to the largest scale it has in one direction (This will be explained in the Connection point / Trigger section). And they're not just simple geometric shapes, they also don't have any collider. This allows you to create sections where blocks go straight through the bodywork. An example would be around the wheels on realistic looking cars so the wheels don't bump the bodywork causing it to break off.
I can't explain what makes the bodywork look good. This can be compared to drawing. I can't really say what you need to do to make a drawing look good, but I know that you can look at what others have made, and try to make similar things yourself. If the reason to why you clicked is to learn how to make good looking bodywork, I hope you understand that it can't really be taught. Only practice makes perfect for this.
- The scaling mod I recommend is Block Transform Mapper. But there are others as well. Notably Easy Scale, Hardscale and PBP4
Warped Bracecubes
Images are probably the easiest way to describe what they are.

The reason why they look like this is because the entire brace is scaled, not each endpoint by themselves. See image below

These can be used the same way normal braces are used, but they can be vastly different shapes and the connection point / trigger area is smaller. With enough practice, you can often use less blocks by having the correct warped brace instead of the blocks you would have used otherwise. But you can easily replace areas where you need to fill in an edge that isn't just 90 degrees.
There are two easy ways to create them. The first way is to duplicate a brace when you are rotating it at the same time. This can be done by holding down the rotation gizmo, and duplicating with Ctrl + D As shown below.


How much you angle it before duplicating it is how much the warp will appear to be "warped". Scaling is of course as important for creating the right shape when warping as well.
The other way is to use the bracecube mod and editing the values yourself.

It's also worth noting that you can warp it as many times as you would like, and in as many specific rotations as you would like. If the brace is warped more than two times, on two different axis, they are sometimes called "Double-Warped bracecubes".
You can of course warp "normal" braces as well.
Connection Points / Triggers
The first end of the brace has the same connection point / trigger as the majority of blocks. It is always spherical and connects only to one other block. The other end of the brace has a different trigger which can connect to many blocks at once. It becomes a spherical super-glue connection.

Additionally, if the first end is connected to a block, but the second isn't. The second trigger will remain "sticky" for approximately 1 second after the simulation has started, meaning that it will work similarly to how grabbers work during that timespan. But instead of attaching to everything, it only attaches to attachmentpoints and certain types of colliders (Cyan-ish color, and green with the Colliderscope mod posted further down)
When building and scaling braces or bracecubes you need to be aware that these connection points always stays as a sphere. The size of the sphere is based on the largest size you scale the block to. Let's say that you create a slim, but long bracecube. This will be the size of the trigger.

This can both be used to your advantage, or in some cases where you don't want everything to connect, it can be quite bad.
Another thing about the brace triggers is that in order to select a brace, you need to select the bar in between each end. With a 0 distance bar like the ones in bracecubes, it will be extremely difficult to select braces unless you know where the bar is located. Here is the small area you can select based on the previously shown long brace.

- You normally can't see this without the Colliderscope mod. So I stronly recommend downloading it to see all the different triggers and connection points
With the Colliderscope mod installed, you can easily see how warped braces always have a smaller connection point compared to normal ones with the same size.

Additional Notes About Braces
BES
There are always strange behaviours found when using braces. An example that can cause a lot of problems, but can be quite useful when used properly is the so called "BES" by many of those who use it.
The name BES (Brace Entanglement Stabilization) comes from another name "VES" (Vector Entanglement Stabilization) both named by the user Neon. VES is a glitch used by creating a 2d scaled spring into a stabilization device. The brace version is similar, hence a similar name, but with a B instead. But it's not the same (Which is why I think the name isn't the best). It's created when you scale down a "normal" brace with a bar in the axis that the bar is pointed. Anything under 1.00 will give a slight effect of this, but when it becomes 0.1 down towards 0.001, effects start happening. It becomes really stabilized and effectively the block it is attached to as well. It is essentially pushing away the center of mass of the creation down towards infinity. There are however side-effects. BES will start to "wobble", but it's really really slow, and since it's so strong, whatever is attached will most likely flip and get crushed in doing so.
Testing is still needed about it, but there are ways people have found to stop this from happening as you might want to use a brace that is smaller than 1.0 in scale. An easy solution, perhaps not the prettiest, is to simply duplicate the brace, turn it 180 degrees, and move it so the startpoint is in the endpoint of the other brace. Mirroring it over essentially.

Long / short midpoint
When scaling normal braces, you can also see that the bar in the middle doesn't scale properly. I generally don't like that this happens, but I know that it can be utilized. I have for example seen cars use these midpoints as decoration, and with the right angles you could probably create various shapes you wouldn't have been able to create otherwise.


